
Equalization sounds like a mixing-engineer problem, not a voice actor one, until a client comes back asking why the file sounds boxy, or thin, or harsh on the esses, and the honest answer is that a small, targeted EQ move would have fixed it before delivery. You do not need to become a mix engineer. You need to recognize five frequency zones on your own voice, know which direction each one usually needs to move, and resist the urge to boost everything until it sounds loud.
The High-Pass Filter Comes First, Always
Below roughly 80 Hz, almost nothing in a spoken voice recording is useful. What lives down there is room rumble, HVAC hum, desk vibration through a mic stand, and the low thump of a plosive that got past your pop filter. A high-pass filter, sometimes labeled a low-cut, removes everything below a set point and leaves the actual voice untouched. This is close to the one EQ move that belongs on nearly every voice over file by default, and it is also the cheapest fix for a room that is not perfectly quiet: treating the room itself solves the cause, a high-pass filter cleans up what is left.
The Muddy Zone: 200 to 400 Hz
A voice that sounds boxy, like it was recorded inside a barrel, almost always has a buildup somewhere in the 200 to 400 Hz range. This is where the fundamental warmth of most speaking voices sits, so a wide cut here thins the voice out; the useful move is a narrow, moderate cut, sweeping a narrow EQ band through that range while listening for the frequency where the boxiness is loudest, then pulling only that specific point down a few decibels. Untreated small rooms make this worse, since parallel walls reinforce exactly this range through early reflections.

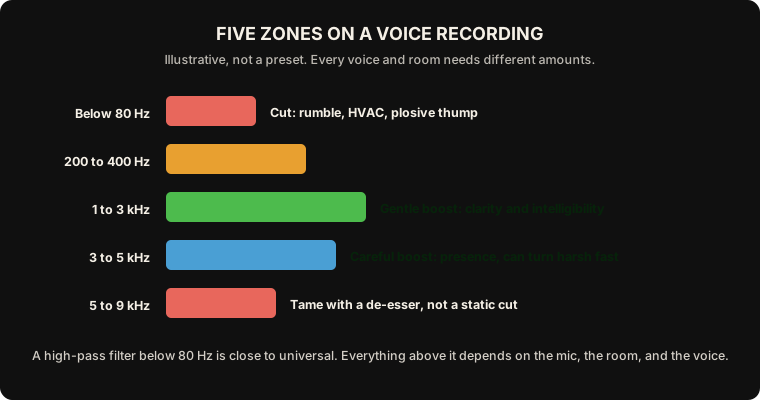
- Below 80 Hz: cut. Rumble, HVAC, and plosive thump. A high-pass filter here is close to a universal default.
- 200 to 400 Hz: cut narrow, only if needed. Boxiness and mud live here. Sweep and cut the specific frequency, not the whole range.
- 1 to 3 kHz: gentle boost, if anything. This range carries consonant clarity and intelligibility on headphones and phone speakers.
- 3 to 5 kHz: boost carefully, in small amounts. Presence and forwardness live here, but it turns harsh and fatiguing fast if pushed too far.
- 5 to 9 kHz: tame with a de-esser, not a static EQ cut. A fixed cut here dulls the whole voice; a de-esser only reacts when an S or SH sound actually spikes.
Presence and Sibilance: Where Most Beginners Overdo It
A small boost between 3 and 5 kHz can make a voice sound closer and more present, the same effect a good condenser microphone already provides on its own. The mistake is treating a little as good and a lot as better; push this range too far and a voice starts to sound harsh, sibilant, and tiring to listen to over a full script, which is exactly the problem you were trying to avoid with fixing mouth clicks and plosives in the first place. If sibilance is already a problem in the source recording, a static EQ cut in the 5 to 9 kHz range is the wrong tool: it dulls every S sound along with the harsh ones. A de-esser, which only engages when sibilance actually spikes, solves the same problem without flattening the rest of the voice.
Match a reference before you trust your ears alone
Load a finished, well-mixed voice over file, your own past work or a reference track, into the same session and switch between it and your new file at matched volume. Ears adapt to whatever they have been hearing for the last twenty minutes; a direct comparison catches a boost or cut you have stopped noticing.
EQ Cannot Fix a Gain Staging Problem
A common mistake is reaching for EQ to fix a recording that was never gain staged correctly to begin with. A signal recorded too hot distorts in ways no equalizer removes; a signal recorded too quiet and then boosted brings up noise floor along with the voice, and boosting frequencies on top of that noise only makes the hiss more audible in exactly the range you just pushed up. Get the recording level right at the source first. EQ is a shaping tool for a clean signal, not a repair tool for a bad one.
↗ Try the tool
Auto Clean Up
Free to try: run a raw take through the Auto Editor and it applies clean, level-appropriate processing automatically, a faster and more consistent starting point than guessing at EQ settings from scratch on every file.
Open Auto Clean Up →Five Zones, Not Fifty Decisions
A useful EQ pass on a voice over file comes down to five zones and a clear sense of which direction each one usually needs to move: cut the rumble below 80 Hz, cut mud narrowly if it is there, boost clarity gently, boost presence carefully, and control sibilance with a de-esser rather than a blunt cut. That is a short, repeatable checklist, not a technical rabbit hole, and it catches most of what makes a file sound amateur before a client ever has to mention it.